Simple Six Board Chest Guide
Pentathlon Entry - PINE - House of Hurts - 2013
(Heh, it took 4 years to get to the internet)
Contents:
Research – Pine, Chests & Carpentry tools
Theoretical Assembly Guide – Construction in abstract
Practice Guide – Construction costs and extra details
Photoessay – The photographs of the construction
Research – Pine, Chests & Carpentry tools
This idea for project is based on extrapolation from two images. The carpentry skills used were taught in the classic way from my father, and Master Ulfgar the Unspeakable.
Pine is a classification of trees. They are native to the Northern Hemisphere, they have been present and highly available soft wood in Europe for recorded history. In Australia, they are an introduced species.
In this project I intend to experiment with pine by making a very low cost chest. I will use the six board method. The chest proportions I will use are much smaller than the extant example I will describe below. This is for reasons of cost and transportation.
 |
| IMAGE 1 - The Merode Altarpiece – Joseph as a Medieval Carpenter– Robert Campin – Completed 1425-1428 - Source: Wikipaintings.org. Downloaded 2013-02-01 |
Transforming pine into furniture can be broken into two stages – the felling and turning the timber into boards. In this project I have purchased premade board, and will be performing joinery. All of the tools that I will be using have an equivalent in the painting “The Merode Altarpiece” which depicts Saint Joseph as a carpenter in the 15 Century. The main variation from the tools in the picture is that I will use a rotary hand drill, which was invented about 100 years later, rather than the bit and brace type drill in the depiction.
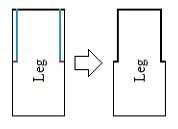
The chest above is a surviving medieval pine six board chest. I will be using the same methods of construction as were used in this chest, cutting six boards, and cutting the ‘leg’ pieces to hold all the other boards, and attaching them using glue and nails. My modification and expansion of the picture shows the distinctive notches in the leg pieces to hold the side boards, and the nail heads.
In this article I have shown that pine was used in medieval carpentry, the tools I used were similar to or simulcrums of medieval tools, and that medieval pine chests were made, and the location of surviving example.
Theoretical Assembly Guide – Construction in abstract
Assembling an inexpensive pine six board chest
Needed: pine board; saw; drill with bit; nails; glue; two squares of leather, a rule and a pencil.
1) Take your board and rule, cut and measure six equal cuts, substantially rectangular in shape.
2) Take your leg pieces, and cut two pieces equivalent to the thickness of the board by width of the board.
3) Lay your chest together excluding the base to check the proportions
4) Drill your holes In the end of the sides. Use a drill bit slightly smaller than your nails. Do not drill at perfect right angles, drill slightly offset. This is so your nails are not all applying force in the same direction, making the board harder to remove, and secured in multiple planes of force.
5) Put a line of glue along the drill holes on the leg pieces, hammer all the sides onto the legs
6) Measure and cut the base board to be the distance between legs of the chest. It should be the length of all the other boards, less two thicknesses of the board. Temporarily secure the base in its final position. Drill nail holes along the base of the side at half a thickness from the base, and mark the equivalent line on the legs, and drill these as well. Test the accuracy of these holes by feeling for the boards with nails. Then glue and nail the base board in position
7) Secure the leather hinges to the chests by nailing them to the side boards and the top.
8) (Optional) Paint, oil or shellac the final product.
Photo Essay: Actual pictures of assembly
The measuring of the board
A cut board
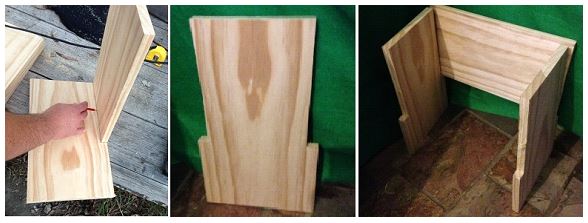
Testing the assembly of two ends and one side
Test the shape and each fitting
Measure a line at half thickness and place each nail in a drilled hole
Test the fit again
Place glue on the board you are about to attach
Hammer the nails
Expect ‘shifting’. This is where the act of nailing the boards moves the previously clean fit away from square. Check the squareness of the assembly each time, and manual manipulation is usually needed to make the piece squared again
The nailed and glued sides and end
The ‘evidence joint’ which shows our finished joint looking very similar to the period piece depicted in the research pictures


No comments:
Post a Comment